 In this post we will walk you through cutting out your own unique envelope liner for your event! (Templates will be included at the bottom of this post) *images are not our own, used for inspo only* Pick your paperThis completely depends on you! You can print an image that you love or use a decorative paper sourced from a craft store like Joann's or Micheal's (that's usually my go to but it can be speedy if you need a lot). You have many options: from a simple solid color to a decorative liner embellished with your initials or your company logo! The options are really endless and you can't go wrong. By handIf you will not be using a cutting machine like a cricut and are using some good old fashioned elbow grease to cut out your envelope liners then we suggest that you 1. Take your background image (this will be the pattern of your envelope liner) and insert it into a word document. 2. Resize the image to fit across the 8.5in x 11in page. 3. Then insert the appropriate envelope liner .png file over top of your other image. 4. Resize the envelope liner so that it is in the appropriate dimensions (you should try this first printing on just a plain sheet of paper to make sure you get the dimensions of your envelope liner spot on). 4a. For the euroflap your width should be 7 inches and height should be 9.5ish inches to fit neatly inside of a 5x7 envelope (the envelope is actually 5.25in x 7.25in. 5. Once you have the envelope outline sized correctly and layed over the desired background then you can go ahead and print the file and cut out as many as you need! 6. We suggest using 2 strips of double sided tape to adhere your liner to your envelope discreetly. An alternative, if you already have the paper you will be using for your envelopes, is to simply print the outline over top of your sheet. OR print out the envelope liner and trace it onto your paper and cut from there! Whatever works--I've done it all on different occasions. Cricut methodIf you've seen any of my instagram stories, you've probably seen me using my cricut to cut envelope liners. It's my new obsession! The awesome thing about using the cricut (besides not having to cut anything yourself) is that if you have the scoring tool it will also score your liners for you which is super nice and looks very professional. (I've included a short video of me working in design space to resize the image I inserted, add a score line, attach the 2 actions and then 'create' the cut. Hope it helps!) 1. First you will start by opening Design Space and starting a new project. 2. You will then go down to the upload tab at the bottom of the left hand menu. 3. In there you will then either upload one of the .svg files we included below. Or you can also upload one of the .PNG files that we've included in this blog also. (We used the .png file) 4. Next, Resize you liner so that the width is 7 inches and leave the shape ratio locked so that you don't mess with that. 5. Insert the score line. To do that you will need to go over to the left hand menu and select the 'shape' tab and select 'score line'. Rotate the score line and move it to the desired placement that looks right to you. 6. Now you will highlight/select both the liner outline and the score line and hit the 'attach' button in the bottom right hand section. 7. Now you can 'Make It'! If you want the file that I have created for this (to bypass these steps) shoot me an email or msg @christinatiffanydesignco on Instagram! Also tag us on social media to show us what you create! Wed love to see what you create :) .png files.svg files (for cricut)Shoot me a msg on social media or an email to [email protected] to get the .svg files that you can upload directly into your cricut and cut! (You may need to resize them).
0 Comments
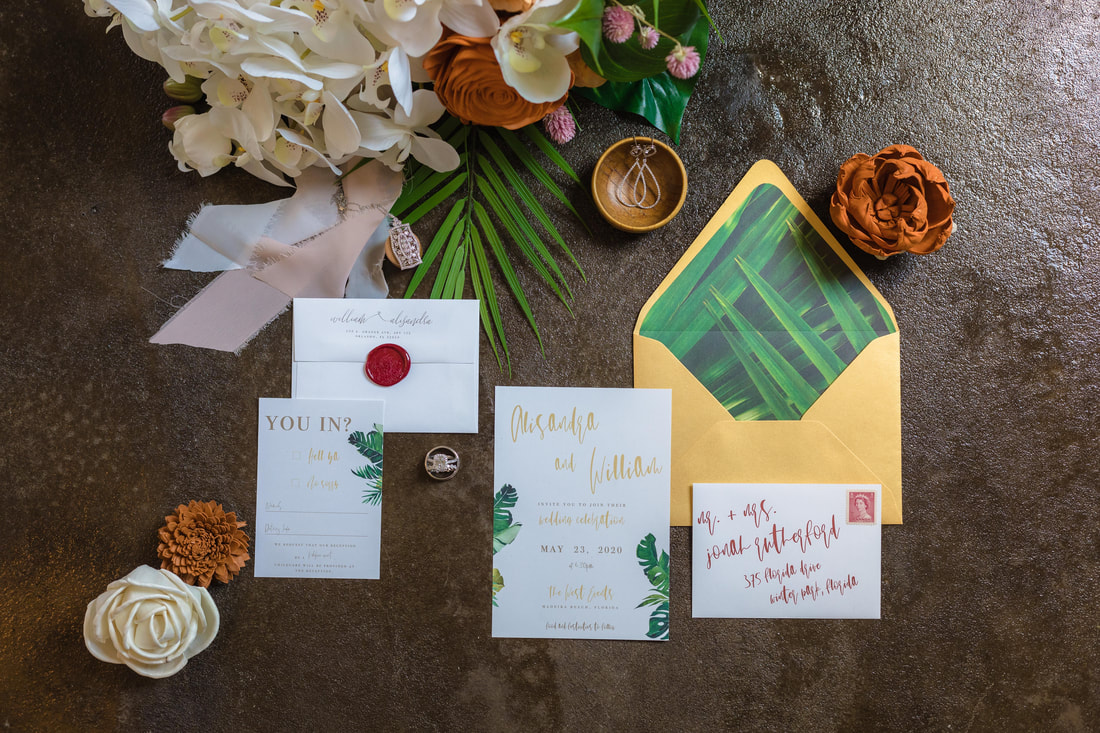
10 things to consider before you make your own invitations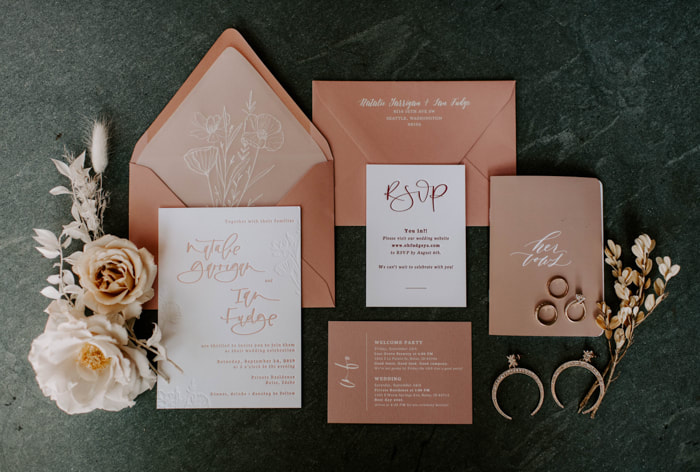 Some brides opt to DIY their wedding invitations and there a few things you should know about before embarking on the journey! That being said, you can get good quality invitations with your at home printer but there are limitations and also many different options... below we'll walk you through some wedding invitation things to consider! Our opinion: If you want a truly luxurious, outstanding wedding suite that is photo worthy we do recommend paying the extra price to work with professionals and have your printing done professionally also. 1. Your timeThe first thing many brides don't consider is that doing invitations yourself takes a lot of TIME! Picking a template, then filling it out, then filling out another and another and another till you find the right one (let's be real!), then printing (if you're using a thick card stock then you will likely be feeding each invitation manually through the printer)-if you're printing on 8.5x11 card stock then you'll be cutting them all out, then addressing each envelope, then placing stamps on... you get the picture. 2. Decide what you want and be willing to pay for itYou first need to sit down and decide what is most important to your partner and you. Is it having the lowest priced invitations? Is it having a unique custom design? Do you really love watercolors? Do you want invitations that give your guests a taste of what your wedding will be like? DO you want a custom designed wedding suite? DIY can also be quite costly (sometimes more than buying from a professional). You need to factor in ink, paper, cutting tools, envelopes, wax seals, and templates--it can all add up very quickly! Once you figure out what is most important in your invitations then you can more easily decide which direction is best for you. Many brides talk to me and have no idea where to start, they want high quality, custom work but want to pay vista print prices and end up frustrated because they haven't budgeted accordingly for the invitations they dreamed of. Artists doing custom invitation work deserve to get paid for all their talent, hard work and the quality of beauty they provide. 3. Paper sizes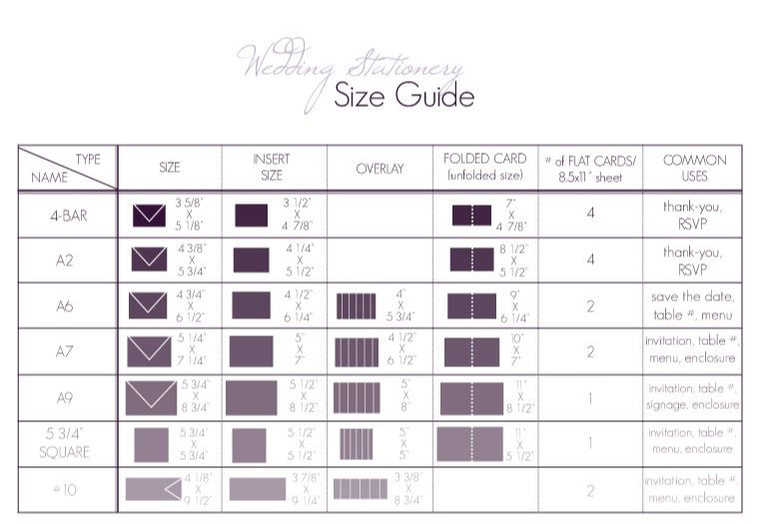 The most common size for invitations is the A7 (5x7) and the most common size for rsvp is a 4-bar. I love to use the above sizing chart to reference when working on any projects! 4. Paper weightsYou've definitely felt the difference between a higher weight paper and a lower weight. (All that weight means is the thickness of the paper) In general a higher weight is more expensive, feels like a higher quality product, and is better for invitations. It's important when printing at home to consider your printer's specs (you'll need to read the owners manual and see what weight you can print on) most have an upper limit of 90lb paper and in general most invitations are printed on at least 100-110lb paper (ours are all printed on 110lb or higher). 5. Handmade Paper Handmade paper is gorgeous, elegant, rustic-and adds a luxurious feel to your wedding suite that shows your guests just how much you care about every detail of your wedding. They are a keepsake that you will remember and definitely worth considering! (as you see in these suites even if you just use handmade paper for one element of the suite it really makes a statement) 6. VellumVellum is a transparent, airy paper that is definitely trending right now! You can add vellum as a save the dates, menu, invitations, place cards, pockets, or envelopes. What is cool about vellum is that you don't take anything away from whatever the invitation is laid down on (if you have beautiful plates then vellum place cards are the way to go!) 7. Pocket Invitation SuitesPocket invitations are a great option if you are sending out a lot of different pieces of paper. Invitations, detail insert, rsvp, they all find a place displayed elegantly in a pocket. You can find some tutorials online to make your own but we suggest the best, easiest, affordable, and least time consuming way is one of our favorite sites: Cards and Pockets. 8. Letterpress & FoilingLetterpress you can not DIY-we've included it because it is a beautiful option that really enhances your invitations. Foiling can be DIYed, however, you will need special equipment and supplies that honestly aren't worth the expense unless you are going to be doing a lot of crafting or starting up your own business. This option is done more reasonably through a professional print shop like Czar Press. 9. Cutting invitations isn't idealTake it from my experience, no matter how precise of a cutting tool you have it is never going to leave as clean of an edge as if you have your invitations ordered from a professional print shop. And if you are anywhere as OCD as I am then you won't be able to stop trimming the paper until it is exactly all perfect, and that can take a while (multiplied by 300 depending on how many rsvp, invitations and save the dates you're printing). Jagged edges only look nice on handmade paper. Just take my advise and buy your invitations precut off of amazon or Cards and Pockets. You won't regret it! 10. Estimate your costs and compareIf you're really serious about saving money then you will need to sit down approximate all your costs and don't forget about the ink (I normally factor in 2-3 ink cartridges per 125 invitations). Do it if you're dead set on itIf you're a crafty person, have the time, and don't mind a few imperfections here or there then definitely go the DIY route for your invitations and please message us with any questions and we will gladly help you out along the way!
If you find that its way too time consuming, is gonna |


